the12volt.com spacer
icon

2010 Honda CR-V Alarm/Remote Start


Post ReplyPost New Topic
< Prev Topic Next Topic >
bushkanaka86 
Member - Posts: 8
Member spacespace
Joined: December 11, 2015
Posted: December 11, 2015 at 8:48 PM / IP Logged  
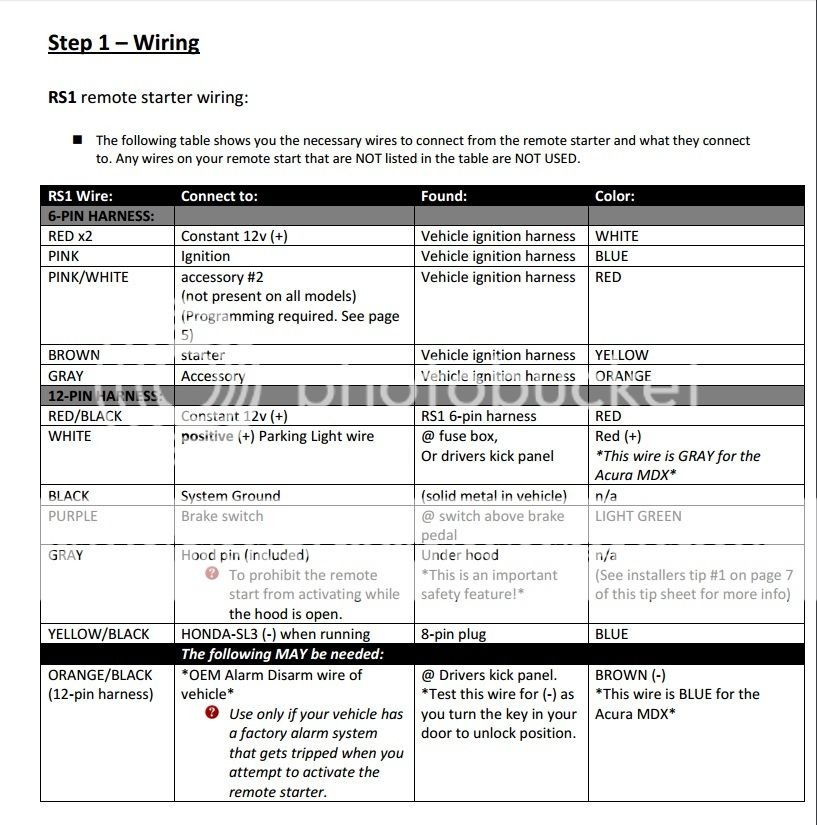
I'm currently installing a remote start in my 2010 Honda CRV LX. My instructions tell me to connect my 12-pin white wire to the (+) Parking Light Wire which should be red, and located above the interior fuse box. I found this thread where someone mentioned it should be in a blue plug but I don't have the plug. Another thread, here, says it should be in a blue plug in the driver kick panel but I don't have any blue plugs in there either.
My instructions, which are supposed to be specific to my vehicle, say it is a red wire by the fuse box. Any idea which red wire?
2010 Honda CR-V Alarm/Remote Start -- posted image.
chev104275 
Gold - Posts: 1,433
Gold spaceThis member has been recognized as an authority in Mobile Security and Convenience. Click here for more info.spacespace
Joined: November 26, 2007
Location: Massachusetts, United States
Posted: December 11, 2015 at 8:51 PM / IP Logged  
Use a multimeter and start testing
If i Can't Install it    I Don't need it   Joe
triniforever 
Copper - Posts: 323
Copper spacespace
Joined: November 12, 2008
Location: New York, United States
Posted: December 11, 2015 at 9:49 PM / IP Logged  
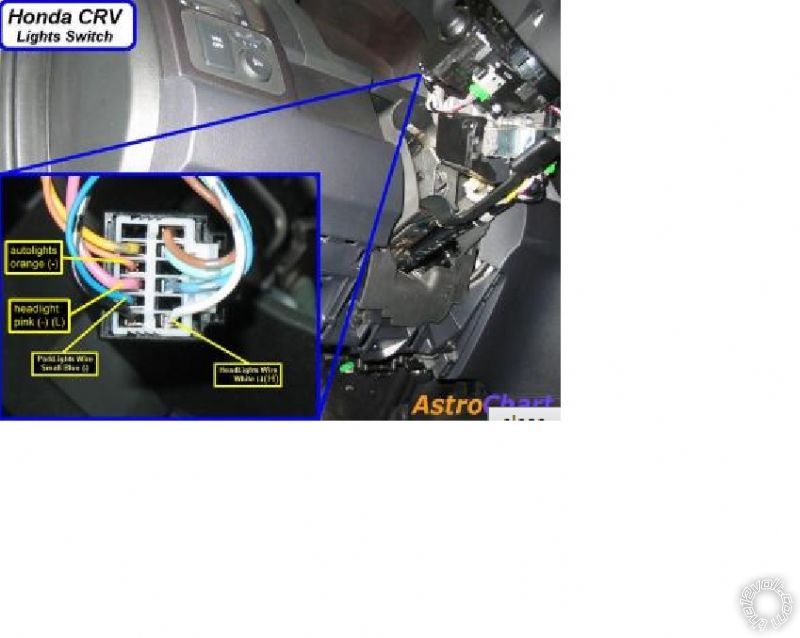
Its probably easier to access the negative parking light wire and its located at the headlight switch which is in a WHITE/ black plug @ the headlight switch and the wire color is blue. What kind of remote starter and bypass module are you using ? Maybe we can help you with the connections .
triniforever
bushkanaka86 
Member - Posts: 8
Member spacespace
Joined: December 11, 2015
Posted: December 11, 2015 at 9:54 PM / IP Logged  
I do have a multimeter, but I'm not sure how I would use it to find out. The instruction book says to use the Ohms setting to test and I am looking for a (+) wire, but I have a couple of questions about that.
This says it is the parking light wire. What are parking lights? Just the auto lights that are always on? I obviously know headlights, reverse lights, brake lights, but how do I turn on parking lights to test the circuit?
Then, once I figure out which ones are parking lights, do I push the red or the black cable into the wire to test and does the other wire go to any ground or something else? If I am measuring resistance, how do I know if it is positive or negative? Will the multimeter actually show me positive and negative or is it more like, when the parking lights are on, the wire is hot meaning it is positive?
Sorry for all the questions. I've been learning a lot of my own car repair and have done pretty well, but the electrical system is completely foreign to me.
bushkanaka86 
Member - Posts: 8
Member spacespace
Joined: December 11, 2015
Posted: December 11, 2015 at 10:15 PM / IP Logged  
triniforever wrote:
Its probably easier to access the negative parking light wire and its located at the headlight switch which is in a WHITE/ black plug @ the headlight switch and the wire color is blue. What kind of remote starter and bypass module are you using ? Maybe we can help you with the connections .
@triniforever, I am installing an RS1-G5 by CrimeStoppers with a Honda-SL3 bypass module.
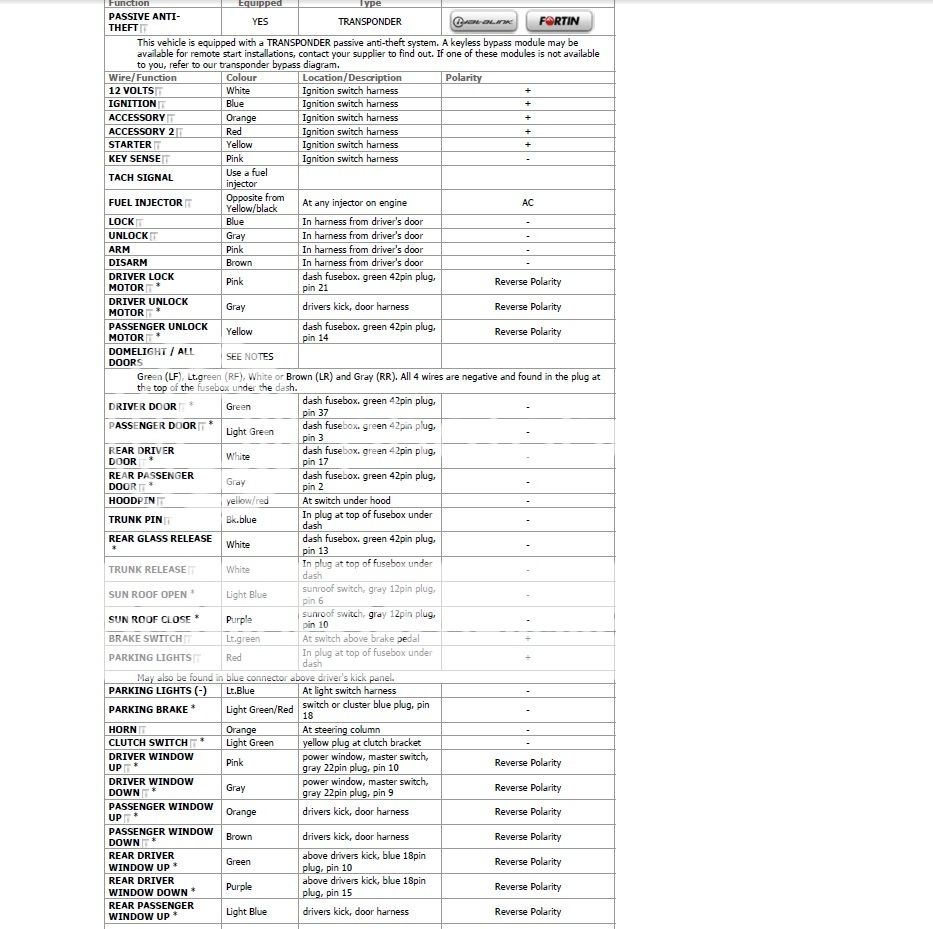
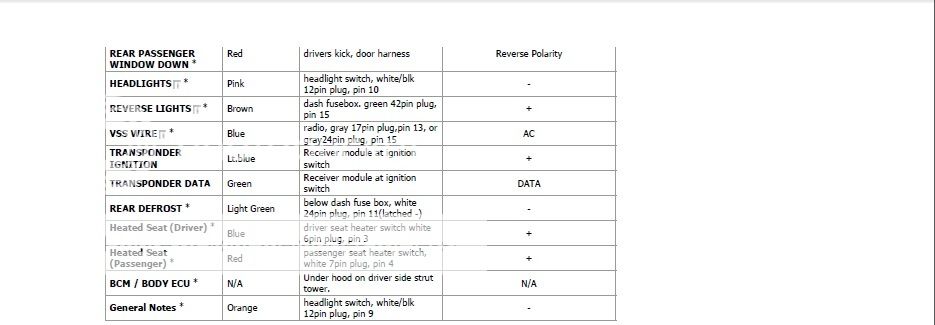
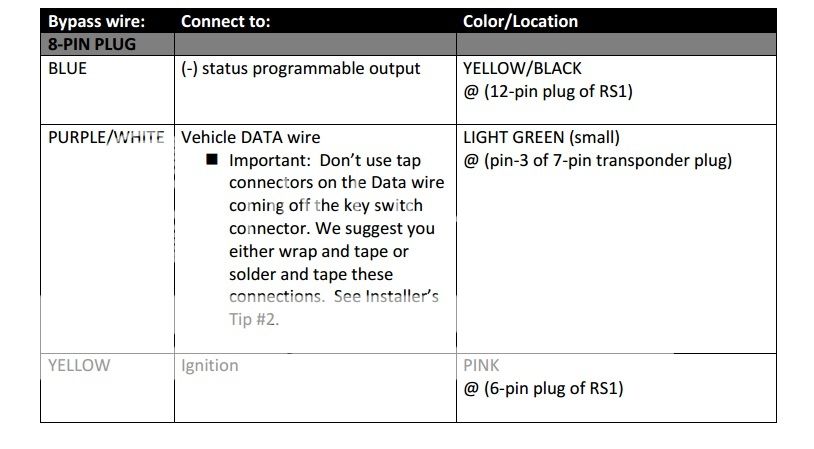
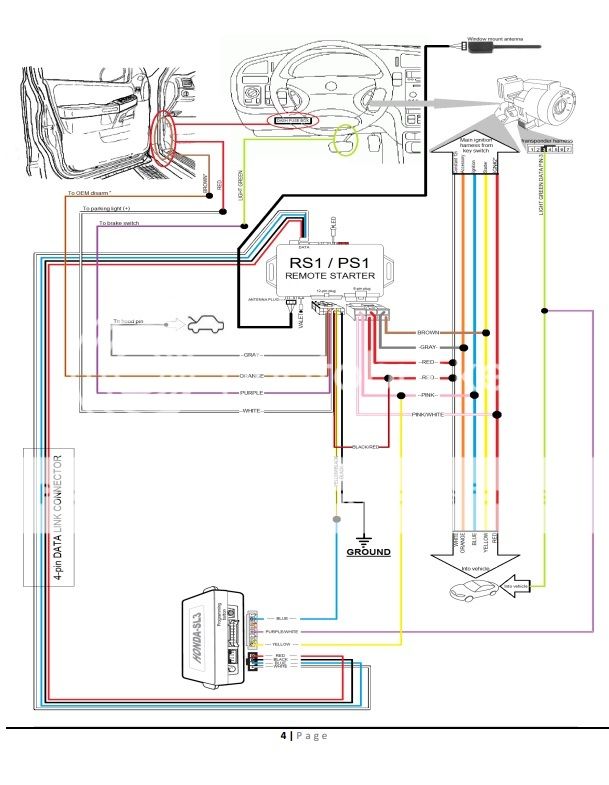
The company I bought it from, MyPushCart.com, sent me a wiring chart and tip sheet that I have been following. There is the relevant wiring portion:
2010 Honda CR-V Alarm/Remote Start -- posted image.
So while it shows me the color and approximate location of the wires, I still have to guess on my own. So far, from images 3 and 4, I have been able to locate with fairly high certainty and connected the 12-pin harness except for Gray and White and all 3 of the 8-pin harness wires. It was getting late so I was gonna tackle the 6-pin harness tomorrow.
bushkanaka86 
Member - Posts: 8
Member spacespace
Joined: December 11, 2015
Posted: December 11, 2015 at 10:17 PM / IP Logged  
I believe the wires listed from the company are the minimum to get the starter working. There are additional features possible such as using the remote to pop the trunk or unlock the doors but they aren't listed in the instructions. If I get the remote start working, then I will worry about the side features.
Thanks for any help you can give!
kreg357 
Platinum - Posts: 7,802
Platinum spaceThis member has made a donation to the12volt.com. Click here for more info.spaceThis member has been recognized as an authority in Electrical Theory. Click here for more info.spaceThis member has been recognized as an authority in Mobile Security and Convenience. Click here for more info.spacespace
Joined: January 30, 2009
Location: Pennsylvania, United States
Posted: December 11, 2015 at 10:38 PM / IP Logged  

Use the CR-V's (-) Parking Light wire as Trini suggested.  Connect the RS1-G5's RED / Black wire to Chassis Ground

and then the White Parking Light wire is a (-) output.  Connect the White wire to the CR-V's (-) Parking Light wire which
is Blue at the headlight switch ( WHITE/ black 12 pin plug, pin 11 ).

2010 Honda CR-V Alarm/Remote Start -- posted image.

Soldering is fun!
kreg357 
Platinum - Posts: 7,802
Platinum spaceThis member has made a donation to the12volt.com. Click here for more info.spaceThis member has been recognized as an authority in Electrical Theory. Click here for more info.spaceThis member has been recognized as an authority in Mobile Security and Convenience. Click here for more info.spacespace
Joined: January 30, 2009
Location: Pennsylvania, United States
Posted: December 11, 2015 at 10:42 PM / IP Logged  

As for DMM usage :

To look for a (+) wire, set the DMM to 20V DC, connect the Black test lead to Chassis Ground and the Red test lead to the

suspect wire.  You will see ~12V DC when the signal is present.

To look for a (-) signal wire, set the DMM to 20V DC, connect the Red test lead to +12V constant and the Black test lead to

the suspect wire.  You will see ~12V DC when the signal is present.

Soldering is fun!
kreg357 
Platinum - Posts: 7,802
Platinum spaceThis member has made a donation to the12volt.com. Click here for more info.spaceThis member has been recognized as an authority in Electrical Theory. Click here for more info.spaceThis member has been recognized as an authority in Mobile Security and Convenience. Click here for more info.spacespace
Joined: January 30, 2009
Location: Pennsylvania, United States
Posted: December 11, 2015 at 10:44 PM / IP Logged  

Here is a link to a wire guide WEB site that will help you a bunch :

http://www.readyremote.com/main.asp?make=Honda&model=CRV

Soldering is fun!
bushkanaka86 
Member - Posts: 8
Member spacespace
Joined: December 11, 2015
Posted: December 11, 2015 at 11:17 PM / IP Logged  
So if I use the Parking Light (-), I would have to move the RED / Black to a ground? Right now, I have it connected to the constant 12V on the 6-pin harness and the black wire is my ground.
Page of 2

  Printable version Printable version Post ReplyPost New Topic
You cannot post new topics in this forum
You cannot reply to topics in this forum
You cannot delete your posts in this forum
You cannot edit your posts in this forum
You cannot create polls in this forum
You cannot vote in polls in this forum

  •  
Search the12volt.com
Follow the12volt.com Follow the12volt.com on Facebook
Thursday, October 31, 2024 • Copyright © 1999-2024 the12volt.com, All Rights Reserved Privacy Policy & Use of Cookies
Disclaimer: *All information on this site ( the12volt.com ) is provided "as is" without any warranty of any kind, either expressed or implied, including but not limited to fitness for a particular use. Any user assumes the entire risk as to the accuracy and use of this information. Please verify all wire colors and diagrams before applying any information.

Secured by Sectigo
the12volt.com spacer
Support the12volt.com
Top
the12volt.com spacer