the12volt.com spacer
icon

viper 4704 on 2012 nissan titan


Post ReplyPost New Topic
< Prev Topic Next Topic >
snutengine 
Member - Posts: 21
Member spacespace
Joined: March 10, 2006
Location: Maryland, United States
Posted: September 21, 2013 at 6:00 PM / IP Logged  
I've figured out most of the wires but want to confirm I'm correct and maybe get some answers on what I'm missing?
H1/1- Red - (+)12VDc Constant Input - Green
H1/3-Brown-Horn - RED / White (-)
H1/4-WHITE/ brown-Light Flash Isolation Wire - Pin 87a light flash Relay - ? Would this be Parking Lights RED / Blue (+) or on a relay
H1/5-White-Pin 30 of light flash relay - ?
H1/6- Orange- 500mA Ground When Armed Output - ?
H2 a little confused on:
H2/6-Green-(-)Door - red (Double pulse) in door
H2/7-BLACK / YELLOW-Dome Light Output-Blue (-)
H2/16-Brown-Brake Shutdown-RED / Green or RED / black (+)
H2/19-Blue-RED / white (-)
H3/1-Pink-(+)Ignition 1 Input/output - BLACK/ Red
H3/2-RED / White - +12V Fused Ignition/Flex Relay - Not needed
H3/3-Orange-(+)Accessory Output - Red
H3/4-Violet - Starter Output - Brown
H3/5-Red- +12V Fused Ignition 1 Output - BLACK/ red or not used?
H3/6-Pink/White-Ignition 2/Flex Relay Output - Not used?
H3/7-Pink/Black-Flex Relay Input 87a - not used?
H3/8-RED / Black-(+)12V Fused Accessory - Red
kreg357 
Platinum - Posts: 7,783
Platinum spaceThis member has made a donation to the12volt.com. Click here for more info.spaceThis member has been recognized as an authority in Electrical Theory. Click here for more info.spaceThis member has been recognized as an authority in Mobile Security and Convenience. Click here for more info.spacespace
Joined: January 30, 2009
Location: Pennsylvania, United States
Posted: September 21, 2013 at 6:36 PM / IP Logged  
Viper 4704 remote start with keyless entry ( no alarm functions ).
Are you using a bypass module? This could change some of the wiring shown below.
Does the truck have a Factory alarm? more connections needed
H1/1- Red - (+)12VDc Constant Input - Green @ Ignition switch harness
H1/3-Brown-Horn -     RED / White (-) @ horn switch connector
H1/4-WHITE/ brown-Light Flash Isolation Wire - Not used
H1/5-White-Pin 30 of light flash relay - RED / blue @ electric brake pre-wire *** Set jumper/fuse to +
H1/6- Orange- 500mA G W A Output -   not needed
H2 a little confused on:
H2/6-Green-(-)Door -   not needed   ( unless manual transmission )
H2/7-BLACK / YELLOW-       not needed ( interior light should come on with Unlock )
H2/16-Brown-Brake Shutdown-  RED / Green @ brake pedal switch
H2/19-Blue-     not used
H3/1-Pink-(+)Ignition 1 Input/output -  BLACK/ Red @ Ignition switch harness
H3/2-RED / White - +12V Fused Ignition/Flex Relay - Green @ Ignition switch harness
H3/3-Orange-(+)Accessory Output - Red @ Ignition switch harness
H3/4-Violet - Starter Output - Brown @ Ignition switch harness
H3/5-Red- +12V Fused Ignition 1 Output -   Green @ Ignition switch harness
H3/6-Pink/White-Ignition 2/Flex Relay Output Light Green @ Ignition switch harness *** Set Viper to Starter2
H3/7-Pink/Black-Flex Relay Input 87a -        not used
H3/8-RED / Black-(+)12V Fused Accessory - Green @ Ignition switch harness
Obtain 30/40 Amp SPDT relay for ACC2. Wire as follows :
Relay Pin 85 to Viper H2/22 Orange
Relay Pins 86 and 87 to Green +12V constant @ Ignition switch harness through 20 Amp fuse
Relay Pin 30 to Purple ACC2 @ Ignition switch harness
Relay Pin 87a    not used
There are other important wires not listed in your chart but I'm assuming you know where they go.
( H2/2, H2/9, H2/17 and H2/23 )
Soldering is fun!
snutengine 
Member - Posts: 21
Member spacespace
Joined: March 10, 2006
Location: Maryland, United States
Posted: September 21, 2013 at 9:29 PM / IP Logged  
kreg357,
Thank you for your help.
Yes, I have the Factory Alarm. I am using the Xpresskit DBALL bypass module using D2D. I think I have the module wiring squared away. I bought 5 relays incase I need them. 1 will be for the DBALL and now 1 for the Alarm
The H2 wiring is where I'm a little stuck. I should have listed all of them. None of the wiring diagrams or right ups I find for the Titan cover some of the numbers.
H2/2-BLACK/ white - (-) Neutral Safety Input)-?
H2/9 - DARK BLUE (-) 200mA STATUS OUTPUT-?
H2/17 is the hood switch
H2/23 is the tach (grey/white (any wire note WHITE/ blue or black at Coil or ECM under hood.
H2 any I may be missing because of alarm or Immobilizer that Xpress won't cover?
kreg357 
Platinum - Posts: 7,783
Platinum spaceThis member has made a donation to the12volt.com. Click here for more info.spaceThis member has been recognized as an authority in Electrical Theory. Click here for more info.spaceThis member has been recognized as an authority in Mobile Security and Convenience. Click here for more info.spacespace
Joined: January 30, 2009
Location: Pennsylvania, United States
Posted: September 22, 2013 at 8:54 AM / IP Logged  
OK 2012 Nissan Titan, auto trans & Factory Alarm with Viper 4704V and DB-ALL w/401.NISS01 v1.04 firmware going D2D.
First, unrequested comments and suggestions.   Nice truck, top shelf remote start unit. Guessing personal vehicle and DIY install. You want a high quality
system / install and have the time to do it right. Why not go with the W2W method and make neat, soldered connections for all the necessary wires between
the Viper & DB-ALL? The D2D only functions supplied by the DB-ALL are not important for your install. I am still not a big fan of DBI D2D and to prevent problems
& "strange issues" still do everything in the W2W mode. Anyway, the choice is yours, D2D will save time ( and look better if you're sloppy ) and you can always
switch over to W2W if it doesn't work properly.
As you are probably aware the DB-ALL must be flashed with the correct firmware ( listed above ) for your install application needs. The DB-ALL preforms a lot
of functions beside the transponder bypass. These functions are listed in the DB-ALL install guide and vary from vehicle to vehicle,   Your truck with the Factory
Alarm will be more difficult. Additionally, while the DB-ALL doesn't specifically list the 2012 model, I'm guessing that it is the same. You will have to add a relay
in the IPDM box under the hood. ( As a side note, the EVO-ALL and the ADS AL CA bypass modules do not require this IPDM relay.)
Anyway, follow the DB-ALL install guide. All of the dashed blue lines are handled by the D2D harness and don't have to be hard wired. Hood Status will only
be available if the the truck has a factory hood pin. The Vipers Neutral Safety Switch input will be the E-Brake signal supplied by the DB-ALL. The (-) Status Output
and the Tach signal is also handled by the D2D connection.
It appears that the way the DB-ALL handles the trucks Factory Alarm is to disable it. Not sure if you want to do that being as the Viper 4704 has no alarm functions.
( There is a way to properly control the trucks alarm with an after-market remote start w/keyless system, by connecting the R/S lock wires directly to the BCM. )
Soldering is fun!
snutengine 
Member - Posts: 21
Member spacespace
Joined: March 10, 2006
Location: Maryland, United States
Posted: September 22, 2013 at 7:10 PM / IP Logged  
Thank you on the truck. I'm very happy with it. The 4704 was on sale and I couldn't pass up getting this unit. Especially with it's range. Viper's website states the DB-ALL is the unit I should use for my 2012. I was up in the air about D2D or W2W. Definitely easier to just do D2D and you are right about many of the functions not used.
I understand now from what you are saying that the W2W DB-ALL connections would go to the H2/ connections on the remote? So if I decided to do the W2W I'd just match up wire for wire.   
Yes, I bought the flash connector and also bought the programmer for the Viper. I need to flash to the version you have listed and I plan on using the programmer to set up the 4704 the way I want it. I also understand that the 4704 comes set up for manual transmission and needs to be changes over to automatic to function.
I didn't realize it would shut off my Factory alarm. I thought that tying in pins 10 & 11 from the blue 14 pin connector on the DB-ALL to pin 38 on the BCM and cutting the wire to make the connections would tie in the alarm? Or is that what disarms it? What are the R/S lock wires and where would I connect them at the BCM?
Thank you again for all of the help. I contacted a few places around here for prices on an install and none of them got back to me. Making my decision easier on doing it myself.
kreg357 
Platinum - Posts: 7,783
Platinum spaceThis member has made a donation to the12volt.com. Click here for more info.spaceThis member has been recognized as an authority in Electrical Theory. Click here for more info.spaceThis member has been recognized as an authority in Mobile Security and Convenience. Click here for more info.spacespace
Joined: January 30, 2009
Location: Pennsylvania, United States
Posted: September 22, 2013 at 8:45 PM / IP Logged  
Going W2W is very easy and logical. Done on the bench prior to install will allow perfect solder
connections and a neat package. You can also just connect the wires needed and omit the un-
necessary ones ( like Trunk & Door Status, Trunk Release, etc ). If you don't normally set the
E-Brake when parked, you can connect the Viper Neutral Safety Input to chassis ground. If your
truck does not have a Factory Hood Pin, you will have to install the hood pin supplied in the Viper
kit.
I believe the BCM Pin 38 LED is just the instrument cluster "Security" light.
As for the Factory Alarm, I'm not sure how the DB-ALL handles it, other than the notes and comments
in the install guide ( I don't use the DB-ALL ). You can install the DB-ALL as per the wiring guide but not
do the DB-ALL programming Option 3 change and see if a remote start or door opening sets off the
Factory Alarm. Then change that programming option and see if the Factory Alarm still works if you
reach in an open window and open the door with the inside handle. If it does turn off the Factory Alarm
all the time, you can re-wire the Viper so the Blue and Green door lock wires go to the BCM instead
of the DB-ALL, as shown in this iDatalink bypass module wiring guide ( see Page 12 ) :
http://cdncontent2.idatalink.com/corporate/Content/Manuals/DL-NI4/ADS-AL(DL)-NI4-EN_20130912.pdf
Having the BitWriter and the XKLoader2 will make things much easier. You can even set the Viper for
Automatic Transmission and Tach Mode while on the bench.
Soldering is fun!
snutengine 
Member - Posts: 21
Member spacespace
Joined: March 10, 2006
Location: Maryland, United States
Posted: September 23, 2013 at 12:45 PM / IP Logged  

You're starting to make me lean toward the W2W install.  I do like soldering stuff. 

I'm glad I did my research about hte prgrammer.  didn't know at 1st that I'd have to have the unit set to automatic transmission and would have had to go somewhere to have it done.  Well worth the money spent.  And, I can set up the temp initiation or timer. 

I really appreciate all of the help you've given me.  It will be a few weeks until I can get this done but when I do I'll post what happened.

Dave

snutengine 
Member - Posts: 21
Member spacespace
Joined: March 10, 2006
Location: Maryland, United States
Posted: September 24, 2013 at 5:22 AM / IP Logged  
Have you ever added the rear defroster? I'm trying to decide if I want to add it or not or just let the heater take care of the inside. If I do where do you think I should tap into the circuit at?
kreg357 
Platinum - Posts: 7,783
Platinum spaceThis member has made a donation to the12volt.com. Click here for more info.spaceThis member has been recognized as an authority in Electrical Theory. Click here for more info.spaceThis member has been recognized as an authority in Mobile Security and Convenience. Click here for more info.spacespace
Joined: January 30, 2009
Location: Pennsylvania, United States
Posted: September 24, 2013 at 5:51 AM / IP Logged  
Here is the Rear Defrost info from Audiovox :
Rear Defrost     YELLOW/BLACK (-)       AT A/C CONTROL UNIT or AT BCM PIN #9
It does say if a single pulse or a latched signal is required, so "locate and test" is in order. The Viper can be programmed for either, pulse or latched output.
Soldering is fun!
snutengine 
Member - Posts: 21
Member spacespace
Joined: March 10, 2006
Location: Maryland, United States
Posted: September 24, 2013 at 7:03 AM / IP Logged  
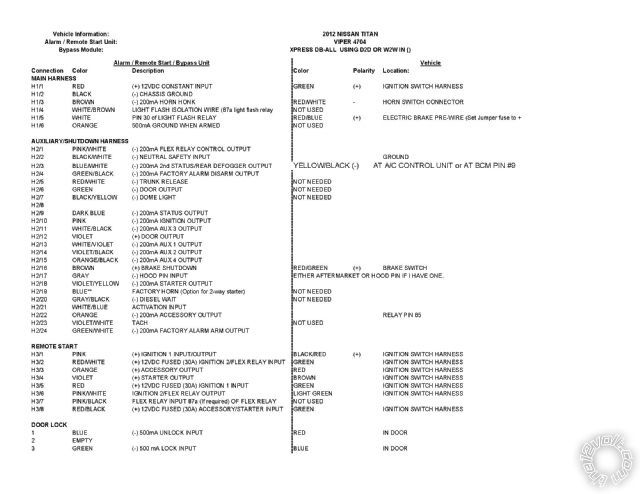
viper 4704 on 2012 nissan titan -- posted image.
So, here would be the final wiring as I believe it to be. sorry I can't upload the XLS file. Not to 50 posts yet.
Page of 2

  Printable version Printable version Post ReplyPost New Topic
You cannot post new topics in this forum
You cannot reply to topics in this forum
You cannot delete your posts in this forum
You cannot edit your posts in this forum
You cannot create polls in this forum
You cannot vote in polls in this forum

  •  
Search the12volt.com
Follow the12volt.com Follow the12volt.com on Facebook
Friday, May 3, 2024 • Copyright © 1999-2024 the12volt.com, All Rights Reserved Privacy Policy & Use of Cookies
Disclaimer: *All information on this site ( the12volt.com ) is provided "as is" without any warranty of any kind, either expressed or implied, including but not limited to fitness for a particular use. Any user assumes the entire risk as to the accuracy and use of this information. Please verify all wire colors and diagrams before applying any information.

Secured by Sectigo
the12volt.com spacer
Support the12volt.com
Top
the12volt.com spacer