the12volt.com spacer
icon

2006 frontier idatalink / dbi interface


Post ReplyPost New Topic
< Prev Topic Next Topic >
slipnfall 
Member - Posts: 36
Member spacespace
Joined: July 11, 2003
Location: United States
Posted: January 03, 2015 at 11:42 AM / IP Logged  
Hi folks -
Has anyone had first hand experience using the ADS-ALCA for this application? 06 Frontier, auto.
This is my first install utilizing a CAN-bus interface module, but not my first remote start install.
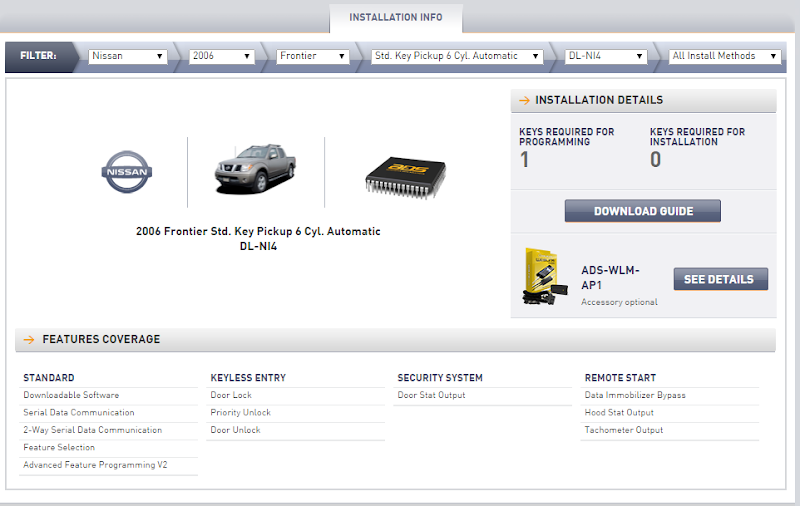
When researching the iDatalink (primarily for key bypass), it appeared that for my application the DL-NI4 firmware was the ticket, because it also provided a convenient interface to tach, door state, etc. So I initially planned to use the DBI port to a V5806.
However now I'm a bit worried because when I flashed the ALCA, NOW the application guide says 2007+. Also, I initially assumed that a *passive* alarm system was NOT considered an alarm. I figured the SE models must have come with an active alarm option. However now it looks like ONLY transponder bypass is supported, if I look closer at the install guide.
Just really confused at this point. Does the fact that I plan on using the DBI interface impact firmware featureset? If I want to simply do wire-to-wire, would I get all the features? I am laying out my harnesses and looms and at this point, I'm considering just ditching the ALCA for any discrete connections, and simply hardwiring all of them (straight to door lock lines, brake stat, door stats, etc). The last thing I want is to get all the other connections made and find out the DBI connection isn't working, or my vehicle isn't actually supported.
Any thoughts, experience w/a Frontier? I believe the '05 and '06 are generally considered the same.
2006 frontier idatalink / dbi interface -- posted image.
This is the TB-N14 firmware:
http://cdncontent2.idatalink.com/corporate/Content/Manuals/TB-NI4/ADS-AL(TB)-NI4-EN_20141219.pdf
And the DL-N14:
http://cdncontent2.idatalink.com/corporate/Content/Manuals/DL-NI4/ADS-AL(DL)-NI4-EN_20141219.pdf
Thanks kindly!
James
slipnfall 
Member - Posts: 36
Member spacespace
Joined: July 11, 2003
Location: United States
Posted: January 03, 2015 at 11:49 AM / IP Logged  
PS if anyone has access to the extended bitwriter options for this system, I would love to take a look.
tedmond 
Gold - Posts: 4,610
Gold spaceThis member has been recognized as an authority in Mobile Security and Convenience. Click here for more info.spacespace
Joined: January 06, 2007
Location: Ontario, Canada
Posted: January 03, 2015 at 7:16 PM / IP Logged  
During the flashing, it will ask what unit youre installing. You will have the option to flash DBI-DL-NI4. The alca will work perfect for this car. If there is a factory alarm, you will need to physically pin the BCM. Not too bad to do, just jam wires in and zip tie it down.
They make the DL software for ease of install, but some people like to hardwire all analogue connections; and use just the TB software for immobilizer.
Ted
2nd Year Tier 1 Medical School
Still installing as a hobby...pays for groceries
Compustar Expert
slipnfall 
Member - Posts: 36
Member spacespace
Joined: July 11, 2003
Location: United States
Posted: January 03, 2015 at 7:58 PM / IP Logged  
HAHA, well you can be assured after all this legwork I will be doing more than twisting and 'typing wires. :) And thanks for the confirmation; I don't have such a sinking feeling having already pulled various unused pins/wires from the harnesses...
Anyway, to some specifics: assuming that I have what they consider the factory 'alarm' - (basically horn goes off it you attempt to open a door after locking w/keyfob). These are all sort of related, but I'll break them up:
I have read that this truck uses a double pulse to disarm/unlock - the first is to disarm, the second is to unlock.
1)When a D2D unlock/disarm request is received to the DEI, passed to the idatalink, then to the BCM, is this purely to operate the locking solenoids? Or does this request take care of the OE disarming also? If not for the idatalink, I would be looking at the below hardwired connections:
- LOCK / LIGHT GREEN to PURPLE (TYPE B) IN DRIVERS KICK PANEL
- UNLOCK / WHITE to LIGHT GREEN (TYPE B) IN DRIVERS KICK PANEL
2)Building on #1, what is the best/most technically correct way to integrate into the factory alarm/keylocks while maintaining factory keyfob functionality (without surprises)?
3)Should I, or do I still need to use (in addition to D2D) a hard-wired output from DEI to factory disarm?
4)If OE and DEI is armed/locked, and I unlock using OE keyfob, is there a factory signal I need to pass to the DEI to disarm?
Thanks so much for your time!
tedmond 
Gold - Posts: 4,610
Gold spaceThis member has been recognized as an authority in Mobile Security and Convenience. Click here for more info.spacespace
Joined: January 06, 2007
Location: Ontario, Canada
Posted: January 03, 2015 at 10:21 PM / IP Logged  
1) The D2D communications from the viper to the idatalink, It will send two types of commands. When unlocking, the idatalink will receive a disarm, and unlock signal in which is sent to the BCM through the data connection. During Remote start, the bypass receives a STATUS output aka ground when running. The bypass then generates a Disarm OE signal only, and will not unlock the doors. If you have a factory alarm, then pinning the BCM will simply tell the vehicle to unlock-start-relock.
Although the door lock wires that you mentioned are the door lock wires, those are not the correct arm and disarm. If you would like to hardwire traditionally, the correct wires are :
Gray (-) (-) @ Driver kick white 24 pin plug. First disarms, second unlocks Can also be found at BCM right of steering column, white 40 pin plug, pin 7
Light Blue (-) @ driver kick white 24 pin plug. Will lock and rearm. Can also be found at BCM right of steering column, white 40 pin plug, pin 8
2)that would be accomplished by everything through the d2d port
3)I recommend you use everything through data, unless you are having a factory alarm disarm issue, then begin hardwiring.
4)the idata will monitor factory the factory alarm controls. So in the event you use the OE remote, it will also disarm the viper. Make sure OEM remote monitoring is turned on in options.
first thing first. prep your unit, install the bypass per instructions provide, then make changes if necessary to suit your needs
Ted
2nd Year Tier 1 Medical School
Still installing as a hobby...pays for groceries
Compustar Expert
slipnfall 
Member - Posts: 36
Member spacespace
Joined: July 11, 2003
Location: United States
Posted: January 04, 2015 at 1:18 PM / IP Logged  
Awesome info, thank you. Now the ALDA installation guide makes sense (it shows, as you said, that for the alarm variant it supports everything *except* lock/unlock, requiring BCM pinning). Some how I misinterpreted that as having zero CAN integration support...Good good good.
Here's a link to my wiring plan, for both the DEI and ALCA unit if anyone would like to take a look. I'll try to copy/paste it below, but it might be a formatting nightmare.
Google Drive - 2006 Frontier Viper ALCA wiring
When I programmed the ALCA, I remember seeing a default option to unlock/disarm when starting. Is this a safety feature, to be able to jump in the vehicle and stop it if something goes wrong?
All the best,
James
slipnfall 
Member - Posts: 36
Member spacespace
Joined: July 11, 2003
Location: United States
Posted: January 04, 2015 at 1:30 PM / IP Logged  
I'll do my best to format this as best possible, but see above link for original doc. These are only what I've determined to be required connections.
DEI CONNECTIONS:
===============
CONN      COLOR            DESC.                              TO LOC./COLOR/NOTES.
H1/1     RED (+)12VDC CONSTANT INPUT   Vehicle - Kick     M6/E10     GREEN     SPLICED w/ H3/5, H3/2, H3/9
H1/2     BLACK (-) CHASSIS GROUND   Chassis   
H1/3     BROWN (+) SIREN OUTPUT   Engine bay   
H1/5     WHITE PARKING LIGHT OUTPUT   Vehicle - near OBD     Trailer Brake     RED     white harness near OBD connector
H2/9     GREY (-) HOOD PIN INPUT (N/C OR N/O)   
H2/13     BLACK/ WHITE     (-) NEUTRAL SAFETY INPUT   GND   
H2/21     VIOLET / YELLOW     (-) 200mA STARTER OUTPUT   Vehicle - Ignition Sw     STARTER2     LT.GREEN     ADD RELAY FOR 2ND STARTER
H3/5     RED (30A FUSED) IGNITION 1 INPUT   Vehicle - kick GREEN     SPLICED to H1/1, H3/2, H3/9     VERIFIED
H3/10     PINK (+) IGNITION 1 OUTPUT           Vehicle - kick     IGNITION1     WHT/GRN     SPLICED     VERIFIED
H3/6     GREEN (+) STARTER INPUT (FROMKEY, to STARTER KILL)     Vehicle - kick     STARTER1     GRAY     Cut/Joined     VERIFIED
H3/7     VIOLET (+) STARTER OUTPUT (TO STARTER, from STARTER KILL)     Vehicle - kick     STARTER1     GRAY     Cut/Joined     
H3/9     RED / WHITE     (30A FUSED) FLEX RELAY (87) +12V INPUT Vehicle - kick GREEN     SPLICED to H1/1, H3/2, H3/5     
H3/4     PINK/WHITE     FLEX (IGN2) (30) OUTPUT (car side of ign, acc or starter wire) Vehicle - kick     IGNITION2     RED     ACTIVE DURING ON->RUN, NOT START, NOT ACC     VERIFIED
H3/2     RED / BLACK     (30A FUSED) ACC/STARTER 12V INPUT     Vehicle - kick GREEN     SPLICED TO H1/1, H3/5, H3/9     
H3/8     ORANGE (+) ACCESSORY OUTPUT   Vehicle - kick     ACCY     GRN/YEL     SPLICED     VERIFIED
Door1     BLUE (-) 500mA UNLOCK OUTPUT   Vehicle - kick     White 24p plug     GRAY     Double pulse to disarm/unlock OE     
Door3     GREEN (-) 500mA LOCK OUTPUT   Vehicle - kick     White 24p plug     LT.BLU     Single pulse lock/arm OE
ALDA CONNECTIONS:
=================
4/1     WHT/BLK IMMOBILIZER DAT, TO BCM   Ignition SW     4-pin near key     Brown     Cut/Spliced
4/2     WHT/RED IMMOBILIZER DAT, TO IMMOB. Ignition SW     4-pin near key     Brown     Cut/Spliced
6/1     BRN/RED CANH
6/2     BRN/YEL CANL
6/3     ORG/BLK IMMOBILIZER DAT, TO BCM   IDATA     4/1     WHT/BLK
6/5     ORG IMMOBILIZER CLK          
6/7     PNK IGNITION (+) INPUT   DEI     H3/10     PINK     TO DEI's IGNITION1 OUTPUT
 
7/1     BLU/RED GROUND (-) INPUT   GROUND     Chassis        
slipnfall 
Member - Posts: 36
Member spacespace
Joined: July 11, 2003
Location: United States
Posted: January 05, 2015 at 12:49 AM / IP Logged  
See I shouldn't have even posted the plaintext version above (can't edit yet), because I've dropped many of the connections. See link for most up to date listing. 2006 frontier idatalink / dbi interface -- posted image.
slipnfall 
Member - Posts: 36
Member spacespace
Joined: July 11, 2003
Location: United States
Posted: January 06, 2015 at 3:50 PM / IP Logged  
After a long night and a few choice words, it's in! Murphy's law prevailed: that *one* harness you wrapped up earlier, before final inspection, is the one with the mis-wire. I'm very grateful that my mistake (on the immobilizer lines) only cost me some time and frustration.
I haven't yet systematically checked every possible function, however alarm, keyless entry, remote start all appear to be working.
One thing however is that unlocking from factory keyfob after armed does unlock, but does not disarm the DEI. I checked all the settings in the ALCA setup, and anything related to locks is on/enabled.
Also is there a way to issue the unlock at the same time as disarming? A few times I caught myself pulling the door handle before it was actually unlocked.
Thanks for the help! Here's a pic or two from along the way:
Big fan of Sta-Kons:
2006 frontier idatalink / dbi interface -- posted image.
Wish this had turned out a little cleaner, but...
2006 frontier idatalink / dbi interface -- posted image.
SPiral wrap:
2006 frontier idatalink / dbi interface -- posted image.
The majority of connections in kick:
2006 frontier idatalink / dbi interface -- posted image.
tedmond 
Gold - Posts: 4,610
Gold spaceThis member has been recognized as an authority in Mobile Security and Convenience. Click here for more info.spacespace
Joined: January 06, 2007
Location: Ontario, Canada
Posted: January 06, 2015 at 5:41 PM / IP Logged  
If the idatalink didn't pick up the disarm or oe signals it's limitation of the vehicle. I've seen some that work and some that don't even though they were same make and model. Weird, but that's just how it is.
Since you need one pulse to disarm and double to unlock, you csn tie your unlock and dis arm together and put that to the vehicles disarm. During remote start the viper issues one pulse for fad. Program the unlock for double pulse.
Ted
2nd Year Tier 1 Medical School
Still installing as a hobby...pays for groceries
Compustar Expert
Page of 2

  Printable version Printable version Post ReplyPost New Topic
You cannot post new topics in this forum
You cannot reply to topics in this forum
You cannot delete your posts in this forum
You cannot edit your posts in this forum
You cannot create polls in this forum
You cannot vote in polls in this forum

  •  
Search the12volt.com
Follow the12volt.com Follow the12volt.com on Facebook
Wednesday, May 1, 2024 • Copyright © 1999-2024 the12volt.com, All Rights Reserved Privacy Policy & Use of Cookies
Disclaimer: *All information on this site ( the12volt.com ) is provided "as is" without any warranty of any kind, either expressed or implied, including but not limited to fitness for a particular use. Any user assumes the entire risk as to the accuracy and use of this information. Please verify all wire colors and diagrams before applying any information.

Secured by Sectigo
the12volt.com spacer
Support the12volt.com
Top
the12volt.com spacer