the12volt.com spacer
icon

Modding Avic-N1/N2 Nav DVD’s


Post ReplyPost New Topic
< Prev Topic Next Topic >
Ballerinstaller 
Copper - Posts: 58
Copper spacespace
Joined: May 18, 2005
Location: United States
Posted: February 23, 2006 at 1:51 AM / IP Logged  

OOhhh I had fun today reflashing my N1 as another revision of my modded nav discs did not work.

The purpose of this post is to further explain the reflashing procedure and other operation buttons.

Sush1a   Initially gave me the info on how to do this and now I give you the information to make it even easier.

You do not need a remote, at least not on my N1.  I just used the POS button on the bottom of the foldout screen to initiate the flash procedure and the BAND button acts as a BACK button.  Read on to see the whole procedure.

This works on my AVIC N1 so I believe that the buttons that I am about to speak of using will also map over to all other units too.

Unit should be on and do not interrupt power until flashing has completed or you will be sending unit back to manufacturer for Jtagging.  Unit will indicate when reflashing has completed.

I am not to be held liable for any damage to your unit and any of this information put forward is strictly for sheer enjoyment.

1.  Eject any DVD's /CD's from unit

2. HOLD EJECT and at same time press the reset button with toothpick or other tiny instrument.

3.  Keep holding the EJECT button as screen will cycle in and out. As screen comes back out, you can release the eject button.

4.  If all of this has been done successfully up to this point,  you should be staring at a screen that says in black and white "Press Reset Button"  DO NOT press the reset button or you will be doing steps 1-3 again.

5. Now this is the time to enter the code sush1a has provided us. While staring at the monitor screen with the message on it,  now use the Joystick to enter the following movements:

UP   RIGHT   UP   RIGHT   DOWN   RIGHT   DOWN   RIGHT    PRESS IN JOYSTICK  and you should be rewarded with a screen that  has some red in it and dissappears quickly and is replace by one that looks like this:

Modding Avic-N1/N2 Nav DVD’s - Page 9 -- posted image.

Use the Joystick  and press it to the right once to navigate to next screen:

Modding Avic-N1/N2 Nav DVD’s - Page 9 -- posted image.

Choose option #6 by pressing down on the joystick until option #6 is highlighted.

Now press the joystick in to select this option.

You should see this screen:

Modding Avic-N1/N2 Nav DVD’s - Page 9 -- posted image.

For most of us, we will be choosing #1, #2 and #3 and obviously not at the same time.

Next we need to insert the NAV DVD that we want to force flash from.  Make sure it is clean and the right version!

Now it will prompt you with a option of what drive to flash from.  Logic dictates that we will be choosing the DVD ROM Drive.

If you try to start the flash by pressing in the joystick, you are wrong.  As sush1a indicated, you can use the /FUNCTION/ button on your remote to initiate this OR as with my N1, You can press the green POS button (middle button on bottom of folding screen).

Watch the data % and do not interrupt power until reflashing indicates complete!  My unit stopped responding after completing task, so you may need to re-enter service mode again and again to reflash all portions of the OS on your N1/N2.  I cycled power and Ba BOOM!  it reset, re-initialized and pow!  Not even a waypoint or the calibration file was touched.

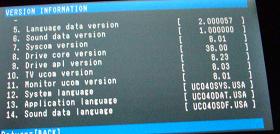
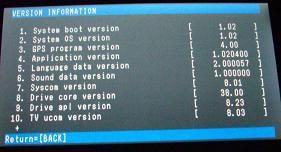
Here is a file version screenshot for you hAckerS out there:
Modding Avic-N1/N2 Nav DVD’s - Page 9 -- posted image.

Modding Avic-N1/N2 Nav DVD’s - Page 9 -- posted image.

Sorry for the long post!

Pioneer Avic-N1
Clarion 300 watt 4 channel amp
PPI PC21400 1400 watt amp
2x JL 12 inch w7's
Polk EX series in factory locations
2000 Impala LS
Baller Installer - Pete D.
free_refil 
Copper - Posts: 72
Copper spacespace
Joined: November 10, 2005
Location: United States
Posted: February 23, 2006 at 4:53 AM / IP Logged  
So once you mod the loading screen you need to reflash it using this procedure to get the new loading screen to work?
Pioneer AVIC-F700BT
Polk Audio MM6
Alpine MRD-M605
Alpine MRV-F450
Alpine SWR-1242D
RF 1 Farad Cap
Streetwires ZN Interconnects
KnuKoncepts Power Wire
Ballerinstaller 
Copper - Posts: 58
Copper spacespace
Joined: May 18, 2005
Location: United States
Posted: February 23, 2006 at 11:42 AM / IP Logged  
No reflashing for modding the loading screen dude.  This is for reverting new firmware back to old firmware and hacking the box. 
Pioneer Avic-N1
Clarion 300 watt 4 channel amp
PPI PC21400 1400 watt amp
2x JL 12 inch w7's
Polk EX series in factory locations
2000 Impala LS
Baller Installer - Pete D.
iracekx 
Member - Posts: 22
Member spacespace
Joined: February 24, 2004
Location: United States
Posted: February 23, 2006 at 1:01 PM / IP Logged  
Ballerinstaller can you guide me in the right direction here.I have DVD Decrypter and CloneDVD2 are you aware if these iso ware is capable of doing this. I take what you are doing is deleting that file taking photoshop and making a picture saving it as the BGOPEN.JPG on the iso image. I would like to make mine look similair to yours wilth the YAMAHA logo in the middle Alpinestar logo in a corner Suomy logo in the other corner on the bottom corner the Yamaha tuning forks logo and the Sidi logo in the other corner. If you could guide me in what to use to create this I would certainly appreciate it. Did you use the 1.2 version if so did affect your bypass mod. Thanks in advance
Life begins at 150..........On a 2005 Blue R1. Full Akrapovic race system/PC3/Chrome wheels/Greggs flush mount turn signals/LP sliders/LP bra/Clifford 2.5/Pit Bull front & Rear stands/
wrecklesswun 
Member - Posts: 46
Member spacespace
Joined: January 20, 2006
Posted: February 23, 2006 at 1:40 PM / IP Logged  
If this makes any sense... check out this web site  http://kiwi-w.mapmaster.co.jp/documents_eng.html  If you look at the media structure, you see there are pointers to certain record data...i wonder if we replace alldata.kwi and change the pointers with the old firmware if it will work...anyone try removing the graffic  i suggested earlier ?
jasonhilton 
Member - Posts: 23
Member spacespace
Joined: October 10, 2005
Posted: February 23, 2006 at 2:12 PM / IP Logged  
We are making fantastic progress with .pims on avic411.com
I had another idea.
Is the N1/N2 DVD Player in the firmware on the DVD? Is it possible to try and copy the DVD Playing firmware to the D1?
wrecklesswun 
Member - Posts: 46
Member spacespace
Joined: January 20, 2006
Posted: February 23, 2006 at 2:41 PM / IP Logged  
I was told from a friend of mine to try replacing the EU040APL.PRG file from the n1 disc to the n2 disc, and see if it works...
wrecklesswun 
Member - Posts: 46
Member spacespace
Joined: January 20, 2006
Posted: February 23, 2006 at 2:43 PM / IP Logged  
If anyone has opened an n1 unit, what is the processor being used ? If we know this that the firmware can be disassembled to find the instruction to look at the solder point for the n2, then the logic to change this can be made. Thanx
Ballerinstaller 
Copper - Posts: 58
Copper spacespace
Joined: May 18, 2005
Location: United States
Posted: February 23, 2006 at 3:36 PM / IP Logged  
I actually used adobe photoshop and used the size constraints of 500x240  and you can also get creative with windows paint too.  That's all folks.  I used Ultraiso to mod the iso and then reburned it.  Then don't forget to reset the N1 to reaccept the new file by pressing the reset button!
Pioneer Avic-N1
Clarion 300 watt 4 channel amp
PPI PC21400 1400 watt amp
2x JL 12 inch w7's
Polk EX series in factory locations
2000 Impala LS
Baller Installer - Pete D.
Ballerinstaller 
Copper - Posts: 58
Copper spacespace
Joined: May 18, 2005
Location: United States
Posted: February 23, 2006 at 3:38 PM / IP Logged  

Thanks for the APL040.prg tip,  I will try it over the weekend

Pioneer Avic-N1
Clarion 300 watt 4 channel amp
PPI PC21400 1400 watt amp
2x JL 12 inch w7's
Polk EX series in factory locations
2000 Impala LS
Baller Installer - Pete D.
Page of 50

  Printable version Printable version Post ReplyPost New Topic
You cannot post new topics in this forum
You cannot reply to topics in this forum
You cannot delete your posts in this forum
You cannot edit your posts in this forum
You cannot create polls in this forum
You cannot vote in polls in this forum

  •  
Search the12volt.com
Follow the12volt.com Follow the12volt.com on Facebook
Thursday, March 28, 2024 • Copyright © 1999-2024 the12volt.com, All Rights Reserved Privacy Policy & Use of Cookies
Disclaimer: *All information on this site ( the12volt.com ) is provided "as is" without any warranty of any kind, either expressed or implied, including but not limited to fitness for a particular use. Any user assumes the entire risk as to the accuracy and use of this information. Please verify all wire colors and diagrams before applying any information.

Secured by Sectigo
the12volt.com spacer
Support the12volt.com
Top
the12volt.com spacer