the12volt.com spacer
icon

first fiberglass project shop display


Post ReplyPost New Topic
< Prev Topic Next Topic >
dranged1 
Member - Posts: 23
Member spacespace
Joined: October 14, 2007
Location: Arizona, United States
Posted: November 11, 2007 at 9:28 PM / IP Logged  

Man that looks like a hell of alot of work you got your self into. If you need help with future projects let me know and I can give some pointer's. 1st one: next time go to a fabric store like Jo Ann's Fabrics and get some 100% Polyester Fleece, not a blanket from Wal-Mart. And make sure to use 100% Polyester Resin, and a fiberglass roller will help get out the air bubbles.

A good tip to have on hand the whole time your fiberglassing is a cup with Acetone in it. It breaks down the resin.

Good luck.

Keeping it real day in and day out...be real to yourself and be willing to be a team player!
offroadzj 
Gold - Posts: 2,043
Gold spaceThis member has made a donation to the12volt.com. Click here for more info.spaceThis member has been recognized as an authority in Mobile Security and Convenience. Click here for more info.spacespace
Joined: June 03, 2005
Location: New York, United States
Posted: November 14, 2007 at 10:49 PM / IP Logged  
i got it carpeted today.... but i gotta get pictures tomorrow. Carpetting is definately not my strong point.. lol. Either way, we didnt have the correct carpet (we only had the thicker style) so it will eventually have to be recarpeted. It definately isnt perfect as we were told to get a display up by black friday, so I had to just throw it together, but the carpet definately hides a lot of the unfinished touches. Overall as a first project, I am definately happy with it. Although it isnt perfect, it looks 1238910340938 times better than our old one. I'll get some pics up asap.
Kenny
Owner / Technician
KKD Garage LLC
Albany, NY 12205
offroadzj 
Gold - Posts: 2,043
Gold spaceThis member has made a donation to the12volt.com. Click here for more info.spaceThis member has been recognized as an authority in Mobile Security and Convenience. Click here for more info.spacespace
Joined: June 03, 2005
Location: New York, United States
Posted: November 29, 2007 at 9:57 PM / IP Logged  
sorry i havent posted updates in a while, but we all know how busy things can get. Here are the temporary finished pics. We only had a really thick, crappy carpet, but we had to get the display finished by black friday, so I threw it together real quick. Once we get some more time I will recarpet it correctly.
first fiberglass project shop display - Page 2 -- posted image.
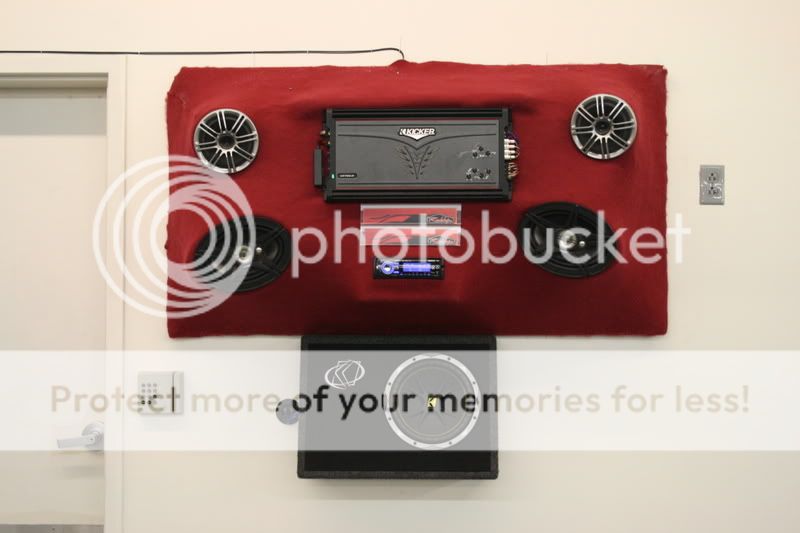
I am VERY happy with how it came out.. esspecially for my first time with fiberglass. The only downside is that it is making our sweet jensen's (JS652/powerplus692) sound better than our Polks do on the sales floor :huh:. The acoustics are absolutely amazing. let me know what you think!
Kenny
The sub was a quick add-on to add some bass to the display. I bolted the box to the wall and flushed a speaker cup into the wall so we can also use it as a test station. And for the record, I know that it is way the hell off center, but I didnt even notice it til after it was on the wall so I will be fixing it when I take it down to recarpet it.
Kenny
Owner / Technician
KKD Garage LLC
Albany, NY 12205
actionjackson 
Copper - Posts: 59
Copper spacespace
Joined: December 20, 2003
Location: United States
Posted: December 01, 2007 at 9:35 AM / IP Logged  
if possible can i see pics of the old display
Jamie Jackson
*CRIMPING AINT EASY*
Ctoh 
Copper - Posts: 123
Copper spacespace
Joined: June 15, 2005
Posted: December 02, 2007 at 1:09 AM / IP Logged  
Has that thing scared any customers off yet?  Sorry man,,,but that thing is pretty rough,,,I think you need to go back to the drawing board and start over,,,
offroadzj 
Gold - Posts: 2,043
Gold spaceThis member has made a donation to the12volt.com. Click here for more info.spaceThis member has been recognized as an authority in Mobile Security and Convenience. Click here for more info.spacespace
Joined: June 03, 2005
Location: New York, United States
Posted: December 02, 2007 at 6:04 PM / IP Logged  
other than the carpetting and the fact that its way off center, what else is rough with it. I dont want to sink anymore money into it because I found out that I am not being reimbursed for it at all. Other than the carpet, and the off-center-ness, I think its pretty good.
Thanks
Kenny
Kenny
Owner / Technician
KKD Garage LLC
Albany, NY 12205
Ctoh 
Copper - Posts: 123
Copper spacespace
Joined: June 15, 2005
Posted: December 02, 2007 at 9:18 PM / IP Logged  

Hopefully you only take this as constructive criticism, if you want to keep doing custom jobs then I think you need a little better direction.  If this is all you plan to do and you think its OK then don't read on anymore.  When I saw the first picture I could forsee that you were going to have stuff breaking when you were stretching your fleece(or your blanket in this case) because it just didn't look that solid.  Your concept and idea did look nice so I commend you for that.  Probably the reason part of your skeleton broke was due to the excessively thick blanket you used to do your wrap.  Too many people think they need to get all the strength of a structure from their initial fleece.  The purpose of this first layer is to give you shape and a base to build on, start with some fleece from a fabric store and take your time to stretch it nice,tight and smooth.  Staple it to rabitted edges on your rings and secure it well to the back of your base.  When applying your mat, take your time, it is easy to get pretty smooth.  You can either roll it or work it flat with your brush, don't try and do too large of an area at a time or your resin will start to thicken and you will be working with paste.  Do a couple layers of mat till your desired strength is attained and apply Dynaglass to the enclosure.  Work it nice and smooth with a spreader, let it dry and sand it down with 36 or so grit to begin your basic curves and shape.  You may want to "spot" dynaglass a few areas you may want to blend a little more.  Sand again then get your final shapes and blends with some Rage Gold.  Get a carpet that will stretch as much as you need it to and you will have a nice looking project when you are done. 

If part of your initial structure breaks when wrapping it, don't break the other side to make it even.  Start over and restregthen what broke and most of your other supports cause they are probably weak as well.  The parts that needed to be blended better are the big hump over the amp and around the head unit it looks like the whole structure is just bulging out of the project, those two things caught my eye right off the bat.  It looked like you may have wanted to have the head unit have a flushed look but with the edges of the structure under the surface sticking out like that that took away from any "flushed" look.  Yeah its off center but my eye was so distracted by the other stuff that I didn't notice that right off the bat.  Take this as constructive criticism and not as a negative,,,

offroadzj 
Gold - Posts: 2,043
Gold spaceThis member has made a donation to the12volt.com. Click here for more info.spaceThis member has been recognized as an authority in Mobile Security and Convenience. Click here for more info.spacespace
Joined: June 03, 2005
Location: New York, United States
Posted: December 02, 2007 at 9:41 PM / IP Logged  
Thanks for the help. THe bulge above the amp was originally supposed to give the amp a more flushed look, but again it didnt. I know that I should have taken more time on it... but the biggest issue that I had was when I found out 1/2 way through that this was coming out of my own pocket, so it pretty much killed any sort of going an extra mile to have it perfect. I do agree 100% that I should have rebuilt the frame as soon as it broke, but again everything was very rushed because of both funds as well as big brother getting on my back to have it completely finished by black friday, and only being able to work on it for a couple hours a week. When I do my next one, I will definately be taking my time on the entire build. But either way, thanks again for the criticism... that is the only way to learn.
Kenny
Owner / Technician
KKD Garage LLC
Albany, NY 12205
Ctoh 
Copper - Posts: 123
Copper spacespace
Joined: June 15, 2005
Posted: December 03, 2007 at 1:43 PM / IP Logged  
Sounds to me like "Big Brother" should have paid if they wanna set the deadline!first fiberglass project shop display - Page 2 -- posted image.  I know how corporate BS can be though,,,good luck on your next project!
ibasspro 
Copper - Posts: 95
Copper spacespace
Joined: October 10, 2007
Location: California, United States
Posted: December 05, 2007 at 4:46 PM / IP Logged  

I wish I could find people with your kind of initiative here.

I cannot veiw the pics from my work computer here, but it sounds like a large project. Take this as a learning exp., & continue to play with it......I bet 1st time you had sex, it wasn't porn star quality...things take practice.

Not seeing the pics, so I am at a dissadvantage....but here goes.

1. Go to wallmarts fabric section & get some 100% polyester fabric. It is SUPER cheap. Look at it, one side is rougher that the other, put the rough side facing into the box, & the smoothe side facing outward)

2. Make a STRONG skeliton. prefer back & bottom (for a shelf top display). not only glue the MDF together, but either brad nail it, or screw it (depending on what tools ya have).

3. Staple the polyester starting form the center outward (i.e. if you are making a DVD display, staple the inner part of the DVD mount, then proceed to the back & bottom, pulling it as you staple, so all wrinkles come out.....starting at a corner can help, leaving the long straight edges to be pulled so you remove folds & wringles. Not need to pull WAYY tight, but tight enough to bounce a quarter off of, otherwise it will have waves as the resing dries.

4. apply resing to the outside & the inside of the display.....at the same time if possible. For a display, no need to add any actuall mat. (unless it is REALLY BIG) let it dry.

5. Cut off the acess, cut open the DVD hole & carpet. If you didn't have any drips, runs, or cracks, & put the smoothe side out, most carpets will hide any bumpyness that the polyester has. You can pull most carpets like the polyester, to pull wrinkles out, & most the time, keep from having any seems where people can see them.

ONLY if you are painting, or vinylin would I sand.

keep playing with it, the material are fairly cheap....try making a set of kick panels for a small worth while project.

used to be loud, used to be fast...now I am married LOL
Page of 3

  Printable version Printable version Post ReplyPost New Topic
You cannot post new topics in this forum
You cannot reply to topics in this forum
You cannot delete your posts in this forum
You cannot edit your posts in this forum
You cannot create polls in this forum
You cannot vote in polls in this forum

  •  
Search the12volt.com
Follow the12volt.com Follow the12volt.com on Facebook
Thursday, March 28, 2024 • Copyright © 1999-2024 the12volt.com, All Rights Reserved Privacy Policy & Use of Cookies
Disclaimer: *All information on this site ( the12volt.com ) is provided "as is" without any warranty of any kind, either expressed or implied, including but not limited to fitness for a particular use. Any user assumes the entire risk as to the accuracy and use of this information. Please verify all wire colors and diagrams before applying any information.

Secured by Sectigo
the12volt.com spacer
Support the12volt.com
Top
the12volt.com spacer